WHAT IT’S FOR:
Enemies can be tanks, worms, spaceships…
A wave is a formation, a group of the same enemy starting from the same position.
Note: an object (pictures, 3d objects...) is a game asset and has its own properties.
!!! If you want to use the same object BUT with different properties:
01.Create a new object with the same visual, e.g.:copy/paste your file
02.Choose a new name
03.Then add new properties.
PROPERTIES:
 SETTINGS TAB
![]() Attach /
Attach / ![]() Detach buttons: you can attach an enemy to another enemy to create complex entities. In this case, the attached enemy will move along with the other one. With this technique you can create a boss, for example, attaching turrets to a big tank, or creating a big enemy with several parts.
Detach buttons: you can attach an enemy to another enemy to create complex entities. In this case, the attached enemy will move along with the other one. With this technique you can create a boss, for example, attaching turrets to a big tank, or creating a big enemy with several parts.
To attach an object to another:
Select the object you want to attach then press the ![]() Attach button in the Attach section of the properties panel. A chain and a hook will move with your mouse: move it on the object you want to attach the other object to (this object outlines should turn red to show you you can attach) and click to validate.
Attach button in the Attach section of the properties panel. A chain and a hook will move with your mouse: move it on the object you want to attach the other object to (this object outlines should turn red to show you you can attach) and click to validate.
To detach an object:
Select the object you want to detach, and click the ![]() Detach button in the Attach section of the properties panel.
Detach button in the Attach section of the properties panel.
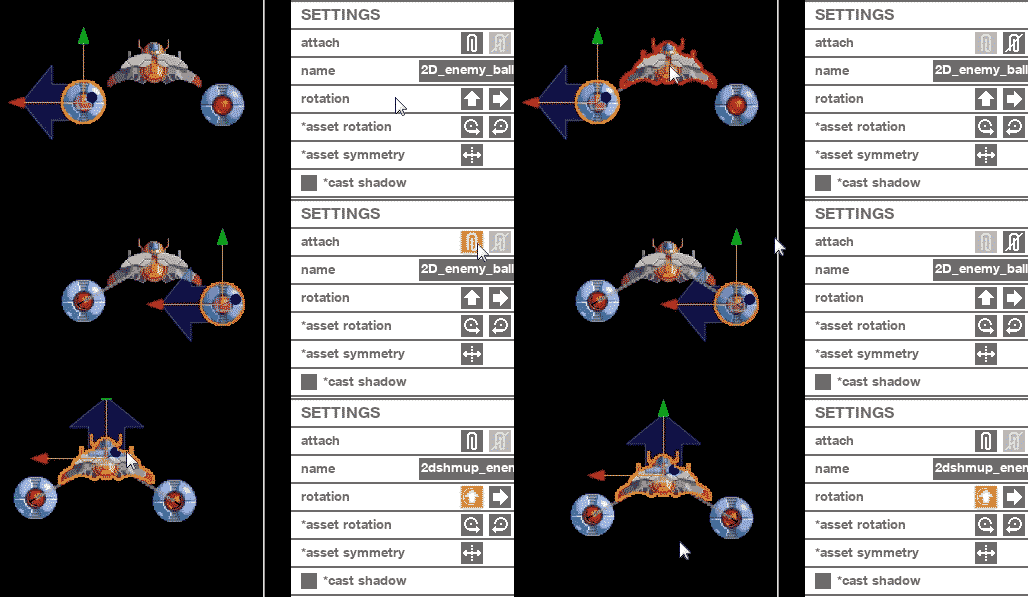
Note: you can choose if killing an enemy should kill all the enemies attached to this enemy.
There is a checkbox in the Gameplay tab of the enemy, "If killed, kill all the attached entities".
![]() Name text field: the name of the enemy.
Name text field: the name of the enemy.![]() Cast shadow checkbox: if checked, the object will cast a shadow on other objects
Cast shadow checkbox: if checked, the object will cast a shadow on other objects ![]() Invisible checkbox : allows you to attach enemies to an invisible enemy and create complex enemy behaviors and animations
Invisible checkbox : allows you to attach enemies to an invisible enemy and create complex enemy behaviors and animations![]() Orientation: the orientation of the enemy. It’s the orientation of the game object, not the graphic asset.
Orientation: the orientation of the enemy. It’s the orientation of the game object, not the graphic asset.![]()
![]() Asset rotation buttons: rotate the asset (3D mesh or sprite) on the Y-axis. Useful if the item graphic is not created in the right direction.
Asset rotation buttons: rotate the asset (3D mesh or sprite) on the Y-axis. Useful if the item graphic is not created in the right direction.![]() Mesh symmetry button: inverse the geometry of the object
Mesh symmetry button: inverse the geometry of the object
Notes: if your assets are not in the right direction (a tank firing backwards, a snake with sprites rotated 90 degrees...), click on the Asset rotation buttons a few times until the asset looks right.
SNAKE
Snakes are special enemies composed of several parts, like a snake or a worm. Snakes can have different objects for the head, the body, and the tail.
see Snake for more.![]() Separation spinner: the distance between each segment.
Separation spinner: the distance between each segment.![]() Segment number spinner: the number of segments.
Segment number spinner: the number of segments.![]() Invincible body checkbox: if checked, the body will be invincible
Invincible body checkbox: if checked, the body will be invincible![]() Invincible tail checkbox: if checked, the tail will be invincible
Invincible tail checkbox: if checked, the tail will be invincible
TANK
If your enemy is a turret, you’ll have additional controls to modify the turret and cannon position and angle.
See Tanks and turrets for more.
Position![]() x/y/z spinners: offset the turret position from the enemy center.
x/y/z spinners: offset the turret position from the enemy center.![]() AIM SPEED spinner: control the speed of the aiming rotation.
AIM SPEED spinner: control the speed of the aiming rotation.![]() Angle limit spinner: you can limit the rotation angle of the turret.
Angle limit spinner: you can limit the rotation angle of the turret.
CANON POSITION
![]() x/y/z spinners: Offset the cannon position from the turret center.
x/y/z spinners: Offset the cannon position from the turret center.![]() Angle limit spinner: you can limit the rotation angle of the cannon. For a tank, for instance, you don’t want the cannon to go the other way around and you should limit the angle to 90 degrees.
Angle limit spinner: you can limit the rotation angle of the cannon. For a tank, for instance, you don’t want the cannon to go the other way around and you should limit the angle to 90 degrees.
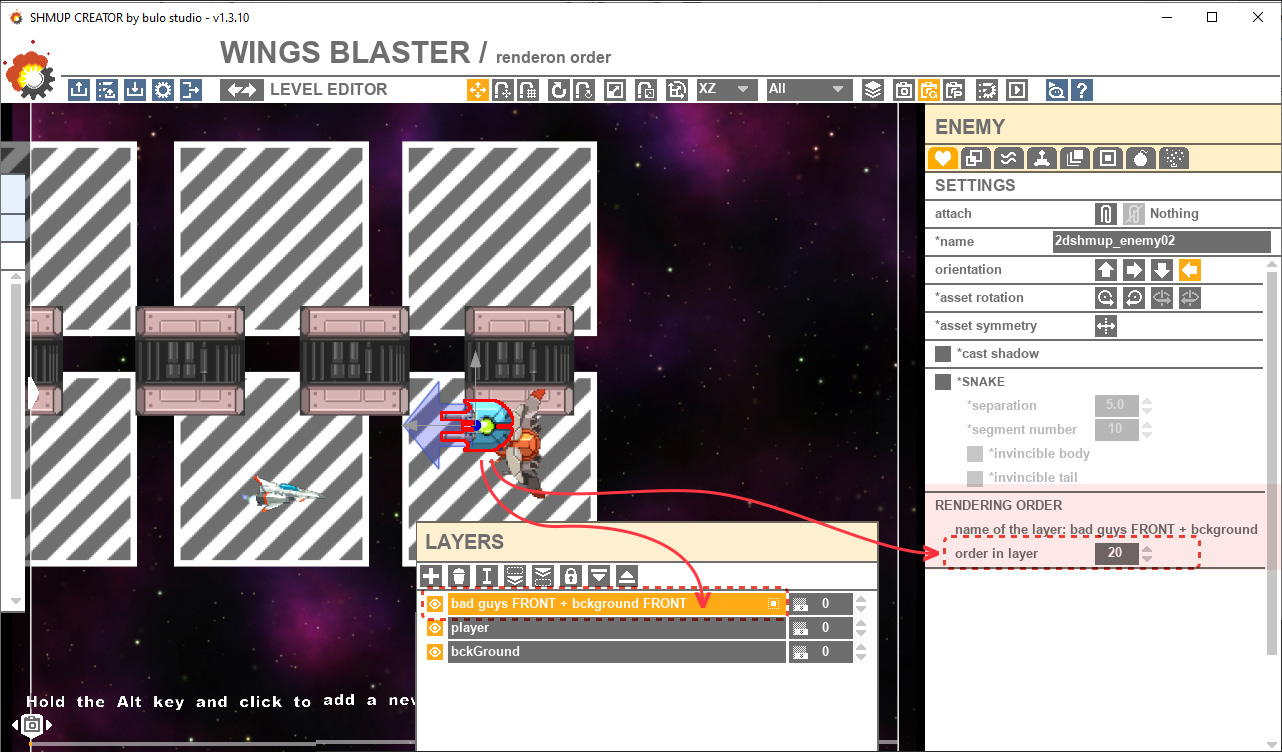
RENDERING ORDER
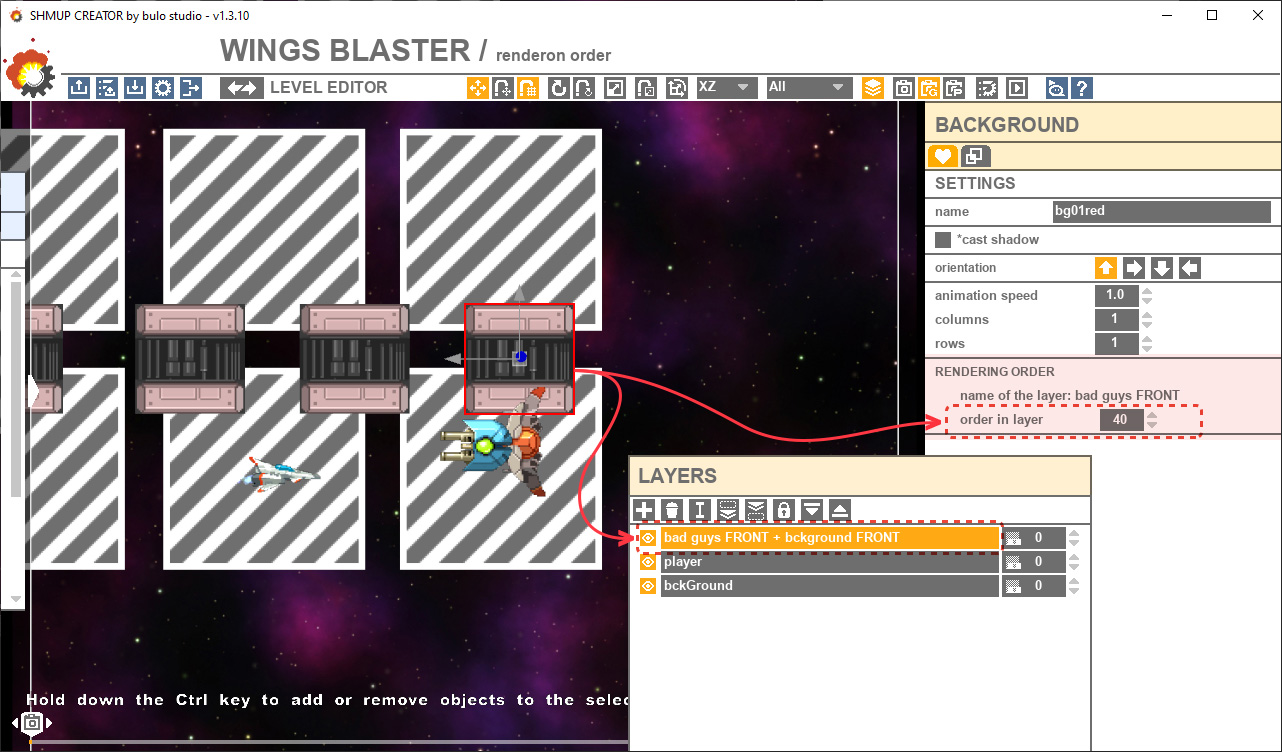
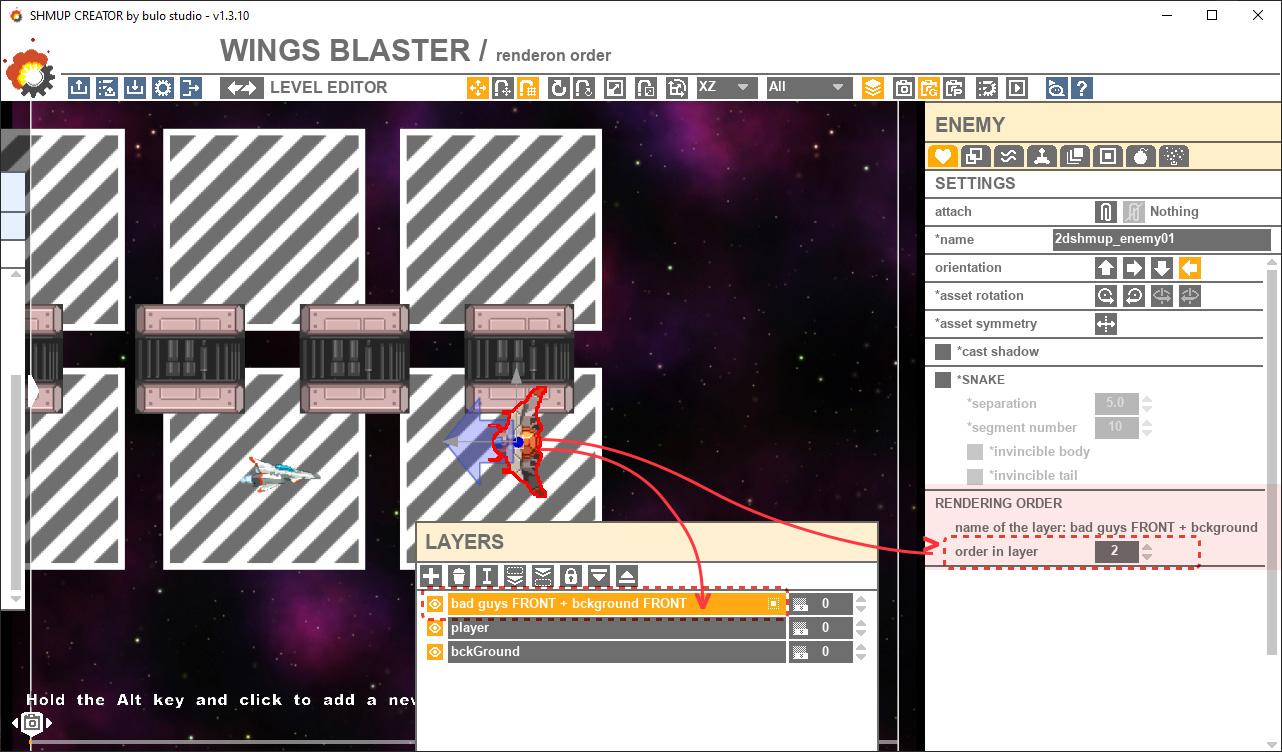
name of the layer: just to remind you where is your sprite![]() order in layer: allows you to choose if your sprite is back or front, if you want a sprite is behind or in front of another one INSIDE ITS LAYER.
order in layer: allows you to choose if your sprite is back or front, if you want a sprite is behind or in front of another one INSIDE ITS LAYER.

RULES INSIDE A LAYER

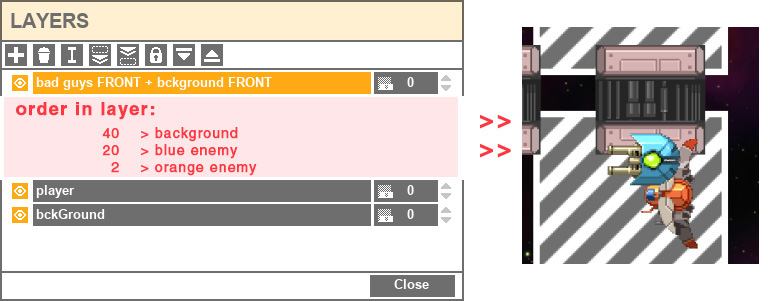
First: Backgrounds are ALWAYS rendered FIRST >> Enemies are always on top

Second: the first sprite rendered is "1" (then the sprite that looks the farthest)

Third: it's possible to have several times the same number but mind the overlap of sprites that creates flickering.
Example:
3 sprites in a layer: 1 background and 2 enemies.
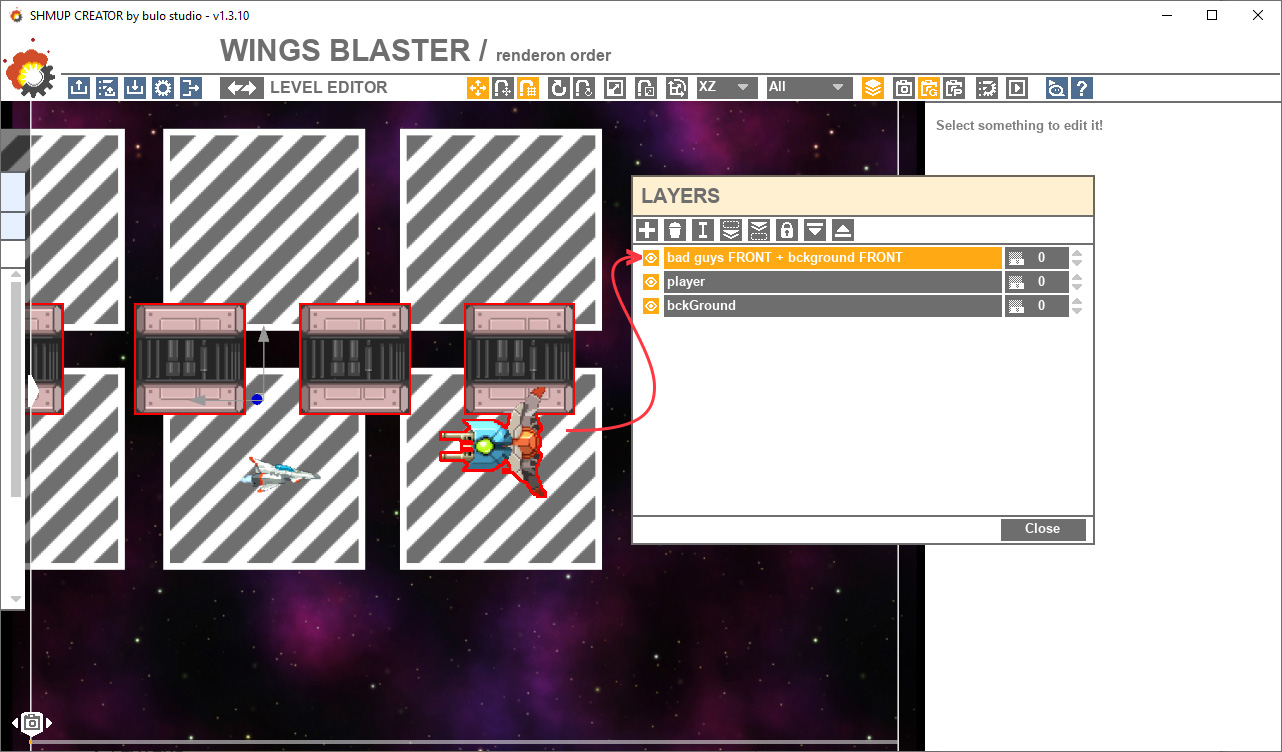
Background: order in the layer = 40
Orange enemy: order in layer = 2
Blue enemy: order in layer = 20
 And the result is:
Even if the background has a bigger number, it’s going to be rendered first.
 WAVE TAB
![]() Attached to the camera checkbox: if checked, the wave will attach itself to the camera. (see Attached to the camera for more)
Attached to the camera checkbox: if checked, the wave will attach itself to the camera. (see Attached to the camera for more)
SPAWN
A wave can spawn several enemies, and you can choose the type of formation.
Type menu:
Point: the enemies will all spawn at the same position
![]() Number/number of spawns spinner: the total number of enemies this wave will spawn over time.
Number/number of spawns spinner: the total number of enemies this wave will spawn over time.
Circle: the enemies will spawn around a circle or an ellipse.
options:
![]() Width spinner: the width of the circle.
Width spinner: the width of the circle.
![]() Height spinner: the height of the circle.
Height spinner: the height of the circle.
![]() Start angle spinner: the position of the first spawned enemy on the circle.
Start angle spinner: the position of the first spawned enemy on the circle.
![]() Circle offset spinner: can push each new enemy to create a swirl.
Circle offset spinner: can push each new enemy to create a swirl.
![]() Number/number of spawns spinner: the total number of enemies this wave will spawn over time.
Number/number of spawns spinner: the total number of enemies this wave will spawn over time.
Random: The enemies will spawn randomly on a plane.
Options:
![]() Width spinner: the width of the plane.
Width spinner: the width of the plane.
![]() Height spinner: the height of the plane.
Height spinner: the height of the plane.
![]() Number/number of spawns spinner: the total number of enemies this wave will spawn over time.
Number/number of spawns spinner: the total number of enemies this wave will spawn over time.
Plane:
The enemies will spawn inside a plane.
Options:
![]() Width spinner: the width of the plane.
Width spinner: the width of the plane.
![]() Height spinner: the width of the plane.
Height spinner: the width of the plane.
![]() Number spinner: lines/columns: you can choose how many lines and columns subdivide the plane, which in turn gives you the total number of enemies the wave will spawn.
Number spinner: lines/columns: you can choose how many lines and columns subdivide the plane, which in turn gives you the total number of enemies the wave will spawn.
Triangle
The enemies will spawn inside a triangle.
Options:
![]() Width spinner: the width of the triangle base.
Width spinner: the width of the triangle base.
![]() Height spinner: the height of the triangle.
Height spinner: the height of the triangle.
![]()
![]() Number/columns spinners: you can choose how many lines and columns subdivide the triangle, which in turn gives you the total number of enemies the wave will spawn.
Number/columns spinners: you can choose how many lines and columns subdivide the triangle, which in turn gives you the total number of enemies the wave will spawn.
ORIENTATION
It allows you to choose the orientation of the enemy at its birth time.
In front: the enemies are oriented in the wave direction.
To the center: the enemies are oriented in the formation center. (ex: at the circle center for a circle)
To the player: the enemies are oriented in the player’s direction.
Random: the enemies are oriented randomly.
To the exterior: the inverse direction of the center.
![]() The number of spawn spinner: how many enemies will spawn from this wave.
The number of spawn spinner: how many enemies will spawn from this wave.
TIMING![]() Start delay spinner: you can add a delay between the wave activation and the first spawn, in seconds.
Start delay spinner: you can add a delay between the wave activation and the first spawn, in seconds.![]() Spawn interval spinner: the time between two enemy spawns.
Spawn interval spinner: the time between two enemy spawns.
![]() Invincibility duration spinner: you can add a small invincibility duration when the enemy is spawned. When the time is up, the enemy is not invincible anymore.
Invincibility duration spinner: you can add a small invincibility duration when the enemy is spawned. When the time is up, the enemy is not invincible anymore.
![]() Keep formation checkbox: if checked, all the spawned enemies will move and rotate like one big formation. If not each enemy will move with its own path and orientation.
Keep formation checkbox: if checked, all the spawned enemies will move and rotate like one big formation. If not each enemy will move with its own path and orientation.
APPEARANCE![]() Hidden when asleep checkbox: if checked, the enemy will be hidden until the wave is activated.
Hidden when asleep checkbox: if checked, the enemy will be hidden until the wave is activated.
If not, the enemy will be visible in the level, even if asleep.![]() Start particle system menu: you can spawn a particle effect at the spawn time.
Start particle system menu: you can spawn a particle effect at the spawn time.![]() Sound menu: the sound played when an enemy appears
Sound menu: the sound played when an enemy appears![]() Volume spinners: the sound volume
Volume spinners: the sound volume![]() Loop checkbox: if checked the sound will loop until the enemy is deactivated.
Loop checkbox: if checked the sound will loop until the enemy is deactivated.
 ANIMATION TAB
ROTATION SPEED![]()
![]()
![]() x / y / z spinners: You can animate the rotation of the enemy on the 3 axes. The bigger the number, the faster the rotation. You can also type up negative numbers to rotate in the other direction.
x / y / z spinners: You can animate the rotation of the enemy on the 3 axes. The bigger the number, the faster the rotation. You can also type up negative numbers to rotate in the other direction.
CURVES
Those features allow moving the enemy using sinuses and cosines. You can quickly add a floating motion to the enemy if you use X and Z, or a sinus motion if you use only one axis.![]()
![]() Amplitude x / z spinners: the distance the enemy can move.
Amplitude x / z spinners: the distance the enemy can move.![]()
![]() Frequency x / z spinners: the speed the enemy will move.
Frequency x / z spinners: the speed the enemy will move.
SPRITE![]() Animation speed spinner: if the texture contains several frames, this setting allows to choose the animation speed.
Animation speed spinner: if the texture contains several frames, this setting allows to choose the animation speed.![]() Columns spinner: set the number of columns of the texture atlas.
Columns spinner: set the number of columns of the texture atlas.![]() Rows spinner: set the number of rows of the texture atlas. (see “Animating sprites” section for more information)
Rows spinner: set the number of rows of the texture atlas. (see “Animating sprites” section for more information)
 GAMEPLAY TAB
![]() HP spinner: the health point of this enemy.
HP spinner: the health point of this enemy.![]() Score spinner: the score when the player kills this enemy.
Score spinner: the score when the player kills this enemy.![]() Hit score spinner: you can add a score when a player bullet collides with this enemy.
Hit score spinner: you can add a score when a player bullet collides with this enemy.
COLLISIONS![]() with player checkbox: if checked, the enemy can collide with the player.
with player checkbox: if checked, the enemy can collide with the player.![]() Damage to player spinner: if the enemy collides with the player, how many HP will be removed from the player.
Damage to player spinner: if the enemy collides with the player, how many HP will be removed from the player.![]() with Player bullets checkbox: if checked, the enemy can collide with player bullets.
with Player bullets checkbox: if checked, the enemy can collide with player bullets.![]() with Enemies bullets checkbox: if checked, the enemy can collide with enemies bullets.
with Enemies bullets checkbox: if checked, the enemy can collide with enemies bullets.
ITEM
When the enemy dies, it can spawn items:![]() Choose menu: what item will be spawned.
Choose menu: what item will be spawned.![]() How many? spinner: how many items will be spawned.
How many? spinner: how many items will be spawned.![]() Spawn radius spinner: the radius of the circle where the item will be spawned.
Spawn radius spinner: the radius of the circle where the item will be spawned.![]() Random direction spinner: if the item moves, this value can randomize the item’s start direction.
Random direction spinner: if the item moves, this value can randomize the item’s start direction.![]() Each spawned enemy spawns items checkbox: if unchecked, the player will need to kill every enemy from this wave in order to spawn the items. If checked, each killed enemy from the wave will spawn items.
Each spawned enemy spawns items checkbox: if unchecked, the player will need to kill every enemy from this wave in order to spawn the items. If checked, each killed enemy from the wave will spawn items.
DEATH
When the enemy dies, it can start an explosion. See Explosion editor for more.![]() Choose menu: the explosion preset.
Choose menu: the explosion preset.![]() Number spinner: the number of explosions.
Number spinner: the number of explosions.![]() Radius spinner: the radius of the circle where the explosions will be spawned.
Radius spinner: the radius of the circle where the explosions will be spawned.![]() Scale spinner: the explosion scale.
Scale spinner: the explosion scale.![]() Hide when killed checkbox: if checked, the enemy hides when killed. If not, the object stays on the screen.
Hide when killed checkbox: if checked, the enemy hides when killed. If not, the object stays on the screen.![]() If killed, kill all the attached entities checkbox: if checked, killing this enemy will also kill all enemies attached to this enemy.
If killed, kill all the attached entities checkbox: if checked, killing this enemy will also kill all enemies attached to this enemy.![]() Cancels its bullets when killed checkbox: if you are displaying enemy HP bars. See HUD editor for more. You can choose with this checkbox to display a big bar for this enemy. (useful for bosses)
Cancels its bullets when killed checkbox: if you are displaying enemy HP bars. See HUD editor for more. You can choose with this checkbox to display a big bar for this enemy. (useful for bosses)
 WAYPOINTS TAB
![]() Choose a path preset button: open the path presets Manager, where you can choose and save path presets.
Choose a path preset button: open the path presets Manager, where you can choose and save path presets.
![]() Create/Add waypoint button: start the Add waypoint mode. In this mode, clicking on the level will add a new waypoint. To stop this mode, click again on the
Create/Add waypoint button: start the Add waypoint mode. In this mode, clicking on the level will add a new waypoint. To stop this mode, click again on the ![]() button, or right-click.
button, or right-click.![]() Delete waypoint button: delete the current waypoint.
Delete waypoint button: delete the current waypoint.![]() Path tension spinner: the tension controls the roundness of the path. 0 will create a harsh transition at the waypoint position. A value of 1 will create a curvy transition at the waypoint position.
Path tension spinner: the tension controls the roundness of the path. 0 will create a harsh transition at the waypoint position. A value of 1 will create a curvy transition at the waypoint position.![]() Speed spinner: the speed the enemy will have when it arrives at this waypoint. The different speeds are interpolated between each waypoint to allow the enemy to change its speed smoothly.
Speed spinner: the speed the enemy will have when it arrives at this waypoint. The different speeds are interpolated between each waypoint to allow the enemy to change its speed smoothly.![]() Wait spinner: when the enemy arrives at this waypoint, it will stop for a moment. The wait value is the duration of the wait, in seconds.
Wait spinner: when the enemy arrives at this waypoint, it will stop for a moment. The wait value is the duration of the wait, in seconds.
ORIENTATION
The orientation is the orientation of the enemy when it arrives at this waypoint. You can choose a different orientation per waypoint, and the enemy will interpolate its orientation during its travel between two points.![]() Path direction radio button: the enemy will orient itself to this angle.
Path direction radio button: the enemy will orient itself to this angle.![]() Player direction radio button: the enemy will orient itself to the player’s direction.
Player direction radio button: the enemy will orient itself to the player’s direction.![]() Aim speed spinner: the speed of the enemy rotation to the player. A bigger value means a faster rotation.
Aim speed spinner: the speed of the enemy rotation to the player. A bigger value means a faster rotation.![]() Fixed orientation radio button: the enemy will follow the path and orient itself in the path direction.
Fixed orientation radio button: the enemy will follow the path and orient itself in the path direction.![]()
![]()
![]() x/y/z spinners: the new orientation.
x/y/z spinners: the new orientation.
WEAPON SETS![]() Change weapon set checkbox: if checked, the enemy will change its weapon set to a new one. It’s a useful feature for bosses: you can use a weapon set, move the boss, then use another weapon sets when the enemy arrives at a particular waypoint.
Change weapon set checkbox: if checked, the enemy will change its weapon set to a new one. It’s a useful feature for bosses: you can use a weapon set, move the boss, then use another weapon sets when the enemy arrives at a particular waypoint.![]() Set menu: the new active weapon set.
Set menu: the new active weapon set.
SOUND![]() Sound menu: the sound is played when the reaches the WP.
Sound menu: the sound is played when the reaches the WP.![]() Volume edit box: the volume of the shot sound.
Volume edit box: the volume of the shot sound.![]() Pitch edit box: the pitch will change the sound height: like playing a lower or higher note. 0.5 is = half pitch, 2.0 = double pitch. default = 1.0.
Pitch edit box: the pitch will change the sound height: like playing a lower or higher note. 0.5 is = half pitch, 2.0 = double pitch. default = 1.0.![]() Pitch variation edit box: a random pitch variation. The higher the number, the bigger the variation range.
Pitch variation edit box: a random pitch variation. The higher the number, the bigger the variation range.
PATH OPTIONS![]() Global speed spinner: the speed of the enemy on the path. This speed is modulated by the waypoint speeds.
Global speed spinner: the speed of the enemy on the path. This speed is modulated by the waypoint speeds.![]() Flip/flop buttons: you can flip or flop the path.
Flip/flop buttons: you can flip or flop the path.
Rotation buttons: you can rotate the path to quickly orient it.![]() Scale spinner: this value modifies the size of the path.
Scale spinner: this value modifies the size of the path.![]() Close path checkbox: if checked, the last waypoint will be connected to the first one, closing the path. The path becomes a loop.
Close path checkbox: if checked, the last waypoint will be connected to the first one, closing the path. The path becomes a loop.
 COLLISIONS TAB
2D COLLISION:![]() Add button: Add a new collision shape
Add button: Add a new collision shape Delete button: Delete the current collision shape
 Navigation arrows: Navigate between the different collision shapes
![]() Invincible checkbox: If checked, the current collision shape will be invincible to bullets and enemies
Invincible checkbox: If checked, the current collision shape will be invincible to bullets and enemies Reset button: Reset the collision shape
 Auto collision button: The tool tries to create a shape following the picture contours.
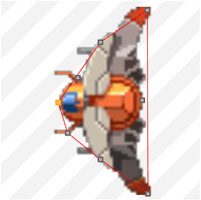 Collision window: move the points to build the shape of your collision
![]() Point position x / y edit boxes: allow to move precisely the selected point.
Point position x / y edit boxes: allow to move precisely the selected point.
Notes:
. The collision shape is always convex, so you can't create any shape. This is why sometimes you need to add several collision shapes to create the right shape.
. You don't always need a super precise shape. It's a shmup: think gameplay first, and try to not add too many collision shapes to an object!
3D COLLISION: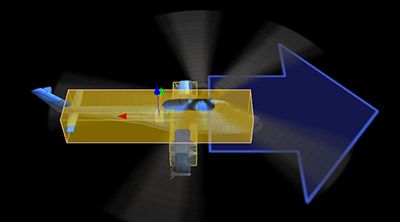
In 3D, the collision shape is always a box.![]() : Add button: add a new collision shape
: Add button: add a new collision shape![]() : Delete button: delete the current collision shape
: Delete button: delete the current collision shape![]()
![]()
![]() Size x/y/z spinners: the size of the collision box
Size x/y/z spinners: the size of the collision box![]() Invincible checkbox: if checked, this collision shape is invincible. You can use this feature to create invincible enemies, and you can add another collision shape to add a vulnerable part.
Invincible checkbox: if checked, this collision shape is invincible. You can use this feature to create invincible enemies, and you can add another collision shape to add a vulnerable part.
 WEAPONRY TAB
Weapon sets are collections of weapons. For more on this, see “weapons“.
![]() Open Weapon editor button: Open the weapon editor (see weapon editor for more)
Open Weapon editor button: Open the weapon editor (see weapon editor for more)
WEAPON SETS New weapon Set button: Add a new weapon set. It will copy the weapons from the current weapon set by default.
![]() Duplicate weapon Set button: duplicate the current weapon set
Duplicate weapon Set button: duplicate the current weapon set Delete weapon Set button: Delete the current weapon set
 Rename weapon Set button: Rename the weapon set
![]() Arrows: Navigate between weapon sets
Arrows: Navigate between weapon sets![]() Name text field: The name of the weapon set
Name text field: The name of the weapon set
Note: maximum weapon sets number is 64
WEAPON LOCATORS New locator button: Add a new weapon to the current weapon set
 Delete locator button: Delete the selected weapon from the current weapon set.
![]() Arrows: Navigate between the locator of the current weapons set
Arrows: Navigate between the locator of the current weapons set
 PARTICLE LOCATOR
 Add particle locator button: Add a new particle locator
 Delete particle locator button: delete the current particle locator.
![]() Arrows: Navigate between the different particle systems.
Arrows: Navigate between the different particle systems.![]() Type menu: Choose the particle system.
Type menu: Choose the particle system.
PARTICLE SYSTEM
![]() Choose a particle system
Choose a particle system
EMISSION![]() All the time radio button: The particle effect will always be alive
All the time radio button: The particle effect will always be alive![]() When moving radio button: The particle effect will be alive when the player moves and stop when he stops. Useful for reactors for instance.
When moving radio button: The particle effect will be alive when the player moves and stop when he stops. Useful for reactors for instance.![]() Scale spinner: You can scale the particle effect. Please note that although the engine will try to scale the particle size as well as the speed as much as he can, it will not be as accurate as modifying the particle effect script directly.
Scale spinner: You can scale the particle effect. Please note that although the engine will try to scale the particle size as well as the speed as much as he can, it will not be as accurate as modifying the particle effect script directly.
