3D CONTENT GOOD PRACTICES
NAMING
Texture name should not contain any space:
My texture .png is not a valid name.
You can use underscore _ instead:
My_texture.png
SCALE
SHMUP Creator units are: 1 unit = 1 meter. You should configure your 3D software to those units. A typical size for an enemy could be 10 meters or less.
TEXTURE FORMATS
Supported formats are:
jpeg, jpg, png, bmp, psd, tga, gif, pic, ppm, pgm, hdr and dds
TEXTURE SIZES
It’s better to create textures with sizes following the Power of Two rule:
-the width and height of your sprite or texture should be of 2,4,8,16,32,64 etc. pixels.
Try to choose the right size for your texture to save memory: if the object is small on-screen, no need to use a 2048×2048 texture.
MATERIALS
The SHMUP Creator can use those textures, depending on the 3D package:
– Diffuse: this is what gives the object its color
– Transparency: the diffuse texture can have an alpha channel to obtain transparent parts on the object. Perfect for tree leaves, helicopter rotors…
– Specular: this greyscale texture allows you to choose what part of the object is shiny. White is shiny, black is not, gey is in the middle.
– Normal: this texture allows you to add small “bumps” and details on your model. There are a lot of tutorials on the web on normal map creation process.
– Emissive: this texture is added to the result during the lighting part. Black does nothing, white will be white. You can add fake lights on your models, as well as computer screen… Everything that is supposed to emit light. You can also use this for lightmaps, with another UV set (for the pros!)
– Reflective cubemap: this texture is reflected on the object. The reflection depends on the specular map, and so the model will be more reflective where the specular texture is bright. This texture has to be a cubemap.
Other properties: specular level and Shininess.
Specular level is the brightness of the specular reflection.
Shininess controls the sharpness of the specular: a bigger value will create a smoother and bigger white dot, a smaller value will create a small and sharp white dot.
Fresnel factor: Fresnel is a property which controls how much visible reflection is on a model depending on the view angle.
White is a strong fresnel: the reflection and specular will be only visible on the edge of the object. Good for non-metallic objects.
Black is Fresnel = 0, and the whole object will be reflective: good for metals. Grey is a good default value. It’s an advanced feature.
MESH OPTIMIZATION
Try to not use too many vertices in your model: most of the objects are small in a shmup. As a guideline, a typical object in Blade of Death has roughly 1000-1500 vertices.
Another important thing is to avoid using too many materials on one object. The less the better: try to use one or two materials per object.
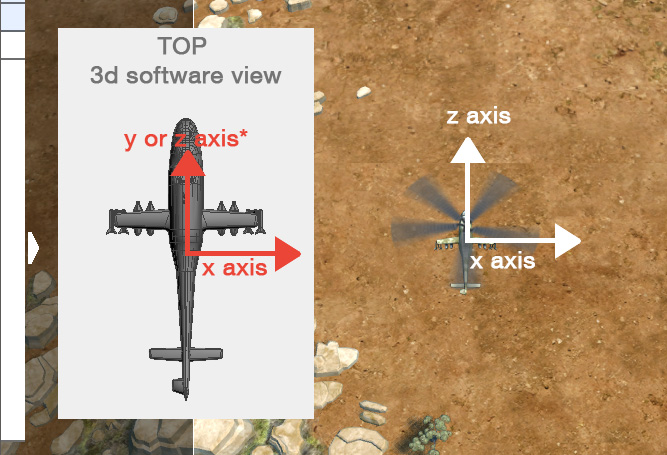
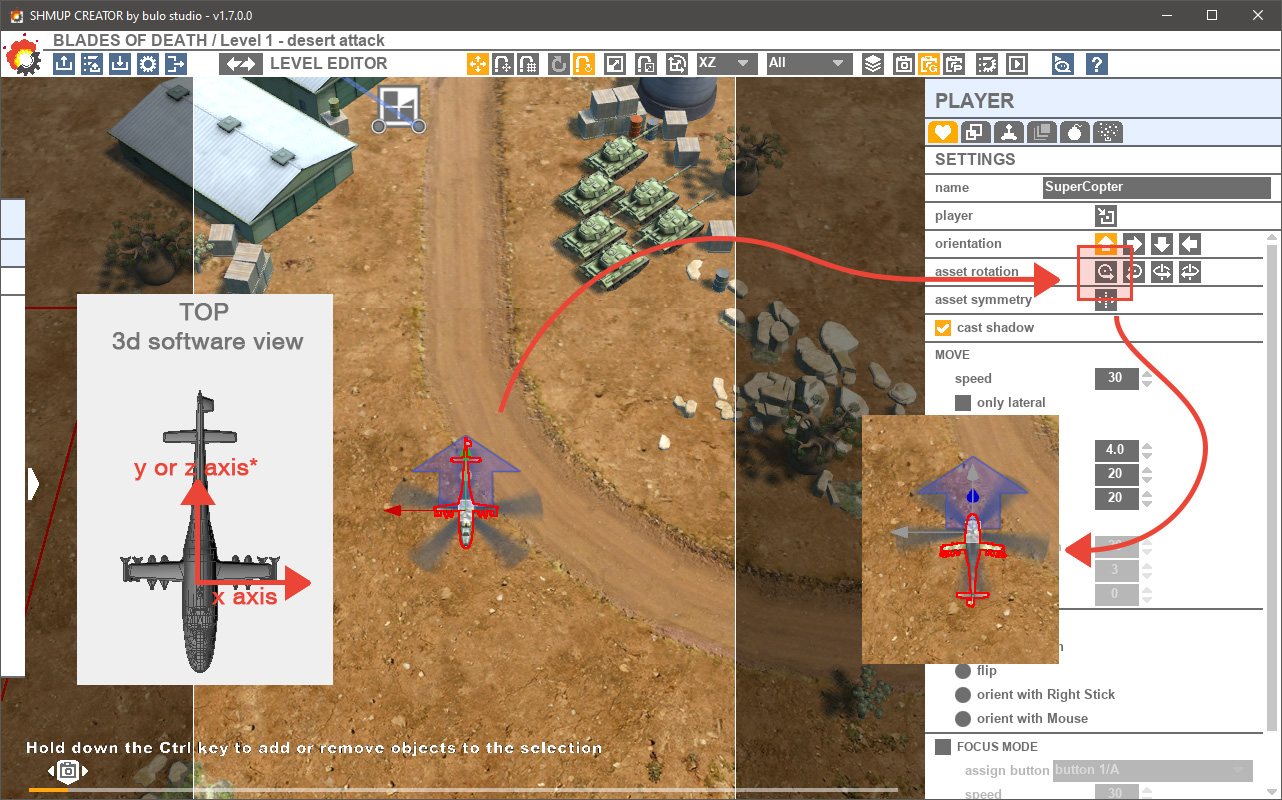
!!! Note: in your 3D tool, mind the orientation of your object according to the way you want your object appears and moves into the game.
Note: if you did it the wrong way, no problem, just use the "asset rotation option".
EXPORTING 3D ASSETS
BLENDER EXPORT
Unfortunately, Blender 2.8 and higher materials are not exporting well to FBX and game engine. You should use Blender 2.79 to export your models.
MATERIALS
You can create textures in Blender and go to each texture Influence:
– the diffuse texture goes in diffuse color
– the specular texture goes in Specular color
– the normal map goes in Geometry normal
– transparent/alpha: if you want some transparency, the diffuse texture should contain an alpha channel. Just apply the same diffuse texture in Diffuse alpha.
– Specular intensity and Hardness control the specular
FBX EXPORT
Select your object and go to File/Export and chose Autodesk.FBX as a format.
Choose where you want to export your object. You can check Selected objects to only export your current selection.
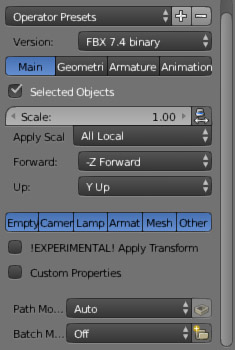
In Scale, choose All Local.
Up: choose Y Up.
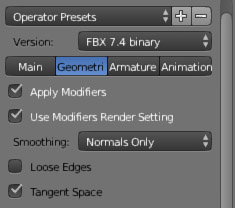
If your models using a normal map, go to Geometries and check Tangent Space.
3dSMAX
MATERIALS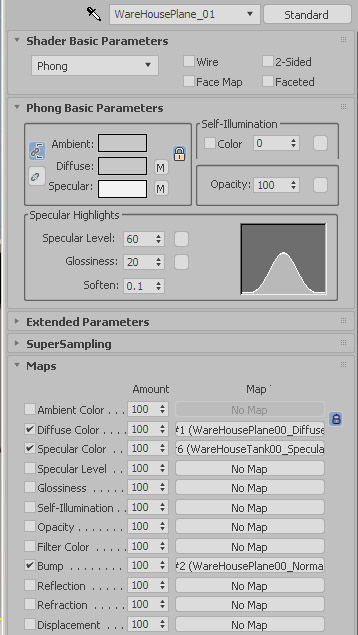
– the diffuse texture goes in diffuse color
– the specular texture goes in Specular Color
– the normal map goes in Bump
– transparent/alpha: if you want some transparency, the diffuse texture should contain an alpha channel. Just apply the same diffuse texture in Opacity.
– Specular level and Glossiness control the specular
– Specular color (the specular color on top of the material) controls the Fresnel factor
FBX EXPORT
Select your object and go to File/Export selected and chose Autodesk.FBX as the format.
Choose where you want to export your object and click on Save. The FBX exporter window will open.
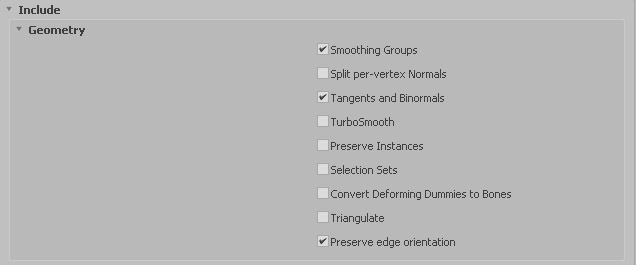 -In the Geometry tab, make sure to check Smoothing groups
-If your models using a normal map, don’t forget to export the tangents and normals. In the FBX exporter, check Tangents and binormals.

– In Advanced options/Units, keep Automatic checked
– In Axis conversion: choose Y-up in the menu.
MAYA
MATERIALS
– the diffuse texture goes in Color
– the specular texture goes in Specular Color
– the normal texture goes in Bump Mapping
– transparent/alpha: if you want some transparency, the diffuse texture should contain an alpha channel. Just apply the same diffuse texture in Transparency.
– the emissive texture goes to Incandescence
– Cosine Power control the specular glossiness
– specular power: no control
– fresnel: no control
FBX EXPORT
Select your object and go to File/Export Selection and chose FBX export as the format. The FBX exporter window will open.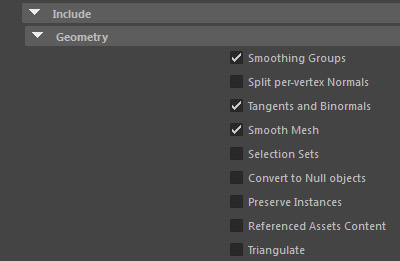
– In the Geometry tab, make sure to check Smoothing groups
– If your models using a normal map, don’t forget to export the tangents and normals. In the FBX exporter, check Tangents and binormals.
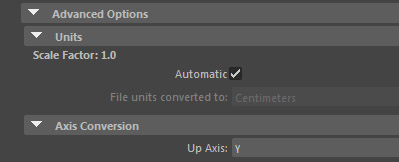
– In Advanced options/Units, keep Automatic checked
– In Axis conversion: choose Y-up in the menu.
Choose where you want to save your file and click on Export selection.
IMPORT
Just save or copy your file in the right directory, and the SHMUP Creator will import the file and add it to your game. More on this on the importing assets section.
Pay attention to copy the fbx file along with all its texture!
